Tuesday, January 10, 2017

Tutorial : Converting a java project to Maven project


Why Maven : You would find lot of articles on usage and power of Maven but in my experience biggest advantage is that you do not have to include/maintain those huge jar files in your code repository server. Very often real code or core of project runs into few mb's but if you include all the dependencies the size can become extremely bloated. With Maven in place developers (and consumers) can happily do quick rebase/clone commands, leaving the time consuming job of including dependencies to Maven. Best still if you have downloaded jars for other project, you do not have to download them again, and maven plugins in IDE (like Eclipse) handles the class paths transparently enough for you.


Imagine a scenario where you started off developing a java project and now would want to share it with developers/customers/testers etc. by leveraging Maven.There were a lot of hardships in converting your existing java projects into Maven earlier, but IDE plugins have have made developers life easier these days.


If you are using new releases of Eclipse, you already have a plugin installed m2e, if not you can download it from here : M2E Plugin

Steps to Convert

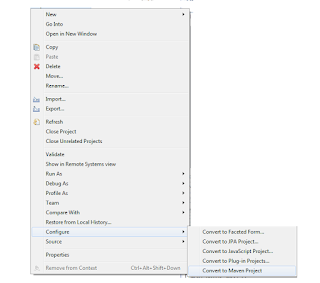
1. Right click on your existing project in eclipse and choose Configure -> Convert to Maven Project


2. Now you can open newly generated pom file in your project and add dependencies, and you can remove references from build path if you had added them manually.

3. If you want to get details on dependencies on jar files, try searching them on maven central. Once you click on the listed jar, you can get information like groupid, artifactid and version you want to use.


4. Once you have added all dependencies, right click on project and choose run as Maven clean, this should trigger download of all dependencies in your maven home directory. This also automatically adds dependencies to referenced libraries of your project, so you do not have to do it manually.

Tuesday, January 3, 2017

Story of an extra leap second and the mayhem it caused.

If you are not a programmer (or even if you are) chances are you missed the news of an extra second being added to clock. This was done to take care of earth slowing down fractionally for its rotation around sun, but that is not what I would be discussing in this blog.


 What I am going to discuss is the mayhem an extra second can cause to software's, specially the ones where performance measurements are done like Load Balancers (F5 etc.) or other DNS servers.

Now the gist of the problem is that developers assume time is Monotonic. In theory there seems nothing wrong with it, but think carefully and you would realize it is not always true. Consider a scenario where I need to calculate performance of a specific module, a quick way is to getTime at start of a function and do a getTime at end of a function and then subtract these 2 values. This seems perfectly correct, after all this is exactly what we do when referring to our stop watches on wrist right.


Important difference here though is no one suddenly makes your stop watch go faster or slower, which is not always true for a computer clock. When the time changes (Daylight or other occurrences like above), good NTP implementations take care of slowing (of fastening) clocks in a smoother manner, bad NTP implementations can change time with jerks on either side.

So your performance function can in all probability tell you that a piece of functionality finished off in less than 0 seconds. Which off-course you know is wrong and can lead to weird functional flows in your application, specially in an application like Load Balancer. 

So never assume time to be monotonic unless it has been guaranteed by underlying library you are using.

Lot of DNS server faced this when clocks stated adjusting to make up for the extra second, case in point being CloudFlare :How and Why leap second affected Cloudflare DNS

Always rely on better mechanisms like currentTimeMillis / nanoTime or if you are using libraries check if they support CLOCK_MONOTONIC or CLOCK_MONOTONIC_RAW.

Tuesday, December 13, 2016

Setting up a server based on GIT repository

GIT ( https://github.com/ ) now supports SSH and it is a fabulous way for administrators to keep their server machines updated with latest code from code repositories.


Present Scenario : Whenever you do a git pull using http mechanism, you have to share your credentials. When there are multiple developers/administrators (which is generally the case now), it is nightmarish doing this.

SSH Scenario : This mechanism allows you to have a machine level access instead of user level, which is an excellent way to keep and maintain code on a typical server infrastructure.

  1. Navigate to directory where you would like to clone git repository
  2. To generate a ssh certificate on your machine use the following command
    ssh-keygen -t rsa -b 4096 -C "your_email@example.com"
  3. Add key information generated earlier to ssh-agent using below commands
            eval "$(ssh-agent -s)"
            ssh-add ~/.ssh/id_rsa
  4. Adding this new SSH key to your GitHub account
    Copy rsa by using command clip < ~/.ssh/id_rsa.pub
    Now navigate in browser to github account and click on Settings -> SSH and GPG keys.
    Paste the copied key in the new key section.
  5. From gitbash prompt add below command to fetch sources to local
    git clone "git@github****/.git"
    Be sure you use SSH url here and not the https.
  6.  and just do a git pull whenever you wish to pull the latest sources.

Note : I find Gitbash extremely convenient when using git on windows.


You can download it from here GIT Download Windows


Wednesday, October 12, 2016

Firefox trick : Opening tabs in same window

                                                    
As a developer I love Tabbed browsing experience on browsers like Firefox and Chrome. So when a customer asked me on how he can prevent opening tabs for all the hyperlinks he clicked on, I was left puzzled.


As with life, every individual has his own preferences while browsing any web based application. Some of us like have links open in new tab, while others may consider it a major distraction and annoyance to maintain these tabs. Check below snapshot on crazy number of tabs


Luckily all browsers allow end users to control how hyperlinks should behave, if they should open the new page in same window or launch a new tab for it. If you are using Firefox, default behavior is opening new tab, but if you want to change it use below instructions.

1. Open about:config
2. Type in browser.link.open_newwindow
3. Change the value to 1 (instead of default being 3).
4. All external links would open in same tab from now onwards.


Thursday, September 22, 2016

Xiaomi Mi Band 2 is finally here !

Xiaomi Mi Band2 is releasing in India finally after a long delay. It would be available on Mi.Com from 27th September and on Amazon from 30th September.


Band promises some serious value for money and can give a headache to competitors like FitBit, who have tasted initial success in Indian market.


Some major features include

1. Insane Battery Life
2. Display (Welcome addition to older model)
3. Great app
4. Sleep monitor
5. Water Resistant


Xiaomi Twiiter Account

Friday, August 19, 2016

MIUI 8, 23rd August is the magical date

So Xiaomi has finally confirmed the roll out date for MIUI 8.


Some of the phones would start getting the OTA from 23rd August, if you do not check out this link to figure out if your devices is getting one

http://en.miui.com/download.html


Now if you are thinking should you go for it, my recommendation would for sure Yes. Below are some of the reasons

1. Completely build from grounds up, lot of performance enhancements

2. Feature I was in particular excited about was Second life. You can have different profiles and data and apps would be saved specifically in that space. A feature which is mostly available in phones targeting high end business executives.


3. Camera app has been updated and lot more options have been thrown in, specially video compressing and editing.

4. Redesigned notification panel.

5. Special focus on blending real time weather in various apps of phone. Weather app in itself looks cool now.

5. Visually appealing, Themes and color combinations look great.

6 Quick ball feature, basically a launcher app to get to your applications more quickly.

A major miss might be on the Operating system, one would have expected Xiaomi to finally upgrade to latest Android versions, but no luck on that.

Overall You should upgrade if your device is supported.

Saturday, June 11, 2016

Getting Started with OAuth2.0 and IBM SmartCloud.


 There are several advantages of using Open Authorization 2.0 (OAuth2.0) framework for accessing resources from a server, over the more traditional ones like Basic or Form authentication, prime being the peace of mind of end user. With OAuth2.0 end users do not have to worry about sharing their credentials with a third party application allowing it to access data from main server on their behalf.                    


There are obviously other advantages like easy mingling of OAuth2.0 with other security protocols like SAML, providing granular access to resources etc., but scope of this article would be making end users secure by allowing them not to share their credentials with any third party applications.

So what's the best way for training a developer on OAuth2.0, who has experience of authentication using Basic and Form standards, show him a sample and show it's not complicated as is the normal perception.

I love the analogy which is used on IBM Smartcloud documentation page to explain OAuth2.0, here is the scenario

1. Mike asks Paul to go to the bank on his behalf.
2. Paul gives Mike his previously registered ID to submit to the Bank.
3. Mike goes to the Bank, proves his own identity, and then submits Paul's ID to register Paul as his courier.
4. Bank confirms with Mike: "Do you want to allow Paul to access your assets?"
5. As Mike trusts Paul, he agrees.
6. Bank grants a temporary code to Mike.
7. Mike passes the temporary code to Paul.
8. Paul immediately goes to the bank to submit the code because the code is short-lived
    (if Paul waits too long the code expires and the process must begin all over again).
9. Bank validates the temporary code submitted by Paul.
10. Bank issues Paul a token that lets him bypass the registration check for the next two hours.
11. Paul accesses Mike's assets. (Note: The Connections Cloud implementation of OAuth 2.0 provides unlimited access to user resources).
12. Within 2 hours, Paul must renew the token so he can continue to access Mike's assets.

As you can see, Mike never shares his banking credentials directly with Paul, instead all Paul has is a temporary token to do transactions on behalf (or impersonating) Mike. This is critical since cases of user credentials being stolen from such third party app stores is becoming all common these days, consider what would happen if the ecommerce site where you stored your card details gets hacked ?

Getting the code part of things

Application Registration
For a third party application wishing to leverage OAuth2.0 on IBM Connections Cloud, it has to register itself with I BM Connections cloud platform. It also has to provide a Callback URL while registering, this is the url where Smartcloud will redirect user to on successful authorization, so it is important to finalize this before application starts registration process.

Upon successful registration platform returns with a ClientId and Client Secret..

OAuth2.0 Dance : Process of an application leveraging OAuth2.0 is often referred to as OAuth2.0 dance.

Step One : When user tries to access Third party application, and it recognizes user is not logged in, it redirects user to the IBM Connections Cloud authorization page using a url like below

https://apps.na.collabserv.com/manage/oauth2/authorize?response_type=code&client_id=<client_id>&callback_uri=<callback_uri>

Once user enters right credentials, an explicit question is asked if user wants to allow 'third party application' to access his data on server


Step Two : IBM Connections Cloud returns with a 302, with the target value header having the value of applications callback url. It also includes a special token called Authorization token.
Here is the format used
https:///<callback-uri>?code=1236879.


Step Three : Third party application then exchanges this authorization code with access token from host server. Here is the api call it would be making

https://apps.na.collabserv.com/manage/oauth2/token?callback_uri=<callback_uri>&lient_secret=<client_secret>&client_id=<client_id>&grant_type=authorization_code&code=<authorization_code>

IBM Connections cloud then returns with access token, which application can use to make api calls on behalf of end users.

Below are some diagrams which explains the above process


Incase you are looking for a sample implementation look at 

1. https://github.com/OpenNTF/SocialSDK
2. https://www.youtube.com/watch?v=BW6t-WeEGs0


Merging and Splitting PDF files

We all use and rely on PDF's. There are occasions though when you want to edit certain portions of a pdf and merge the edited version ba...